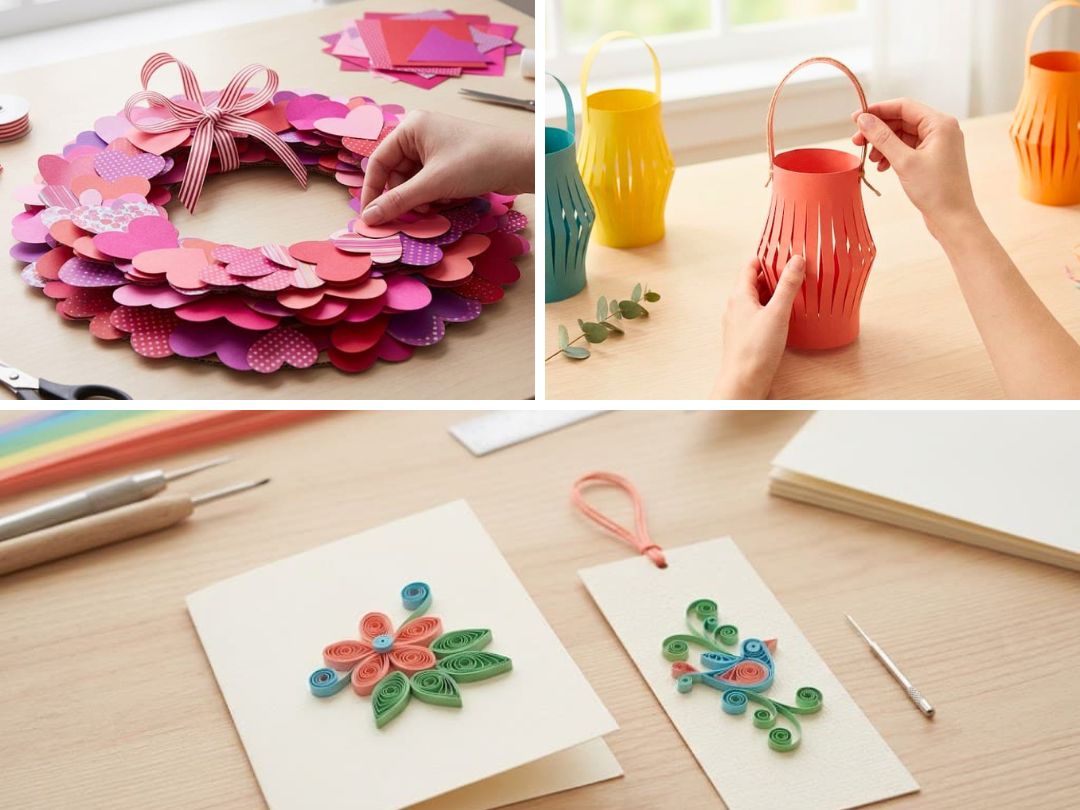
A while back, I decided to make a paper garland for my room. How hard could it be? Forty minutes later, I had glue on my sleeve, a crooked chain that looked like it had given up on life, and a new respect for people who do this for a living. The next day, I tried again, and it actually looked cute. That’s one thing I love about crafting: the more you practice, the faster and better you become, and the more ideas come to you. If you’re looking for easy crafts to do at home with paper, you’re in the right place.
These 15 ideas are beginner-friendly, use simple supplies, and include a few projects you can finish in about five minutes. Some make lovely decorations, others are thoughtful handmade gifts, and a few could even become products to sell.
Whether you want something creative to do on a quiet afternoon, a fun activity for the kids, or a simple way to brighten up your home, there’s an idea here for you. Pick the one that catches your eye and give it a try.
Supplies You’ll Need for Paper Crafts
You probably have most of what you need at home already. Gather a few basics before you begin:
- Paper in different colors, patterns, or textures
- Scissors
- Glue stick or craft glue
- Ruler and pencil
- Markers, crayons, or colored pencils
- Tape
- String, ribbon, or thread for hanging decorations
- Cardboard from an old cereal box for sturdier projects
You can also reuse old magazines, wrapping paper, paper bags, and clean junk mail. Printer paper works well for simple folding projects, cardstock holds its shape for decorations and cards, and tissue paper is great for flowers.
You don’t need to buy everything at once. Start with the supplies you have and add more as you try different projects.
Easy Paper Crafts for a Quick Creative Break
These simple projects are good choices when you want to make something without spending the whole afternoon on it.
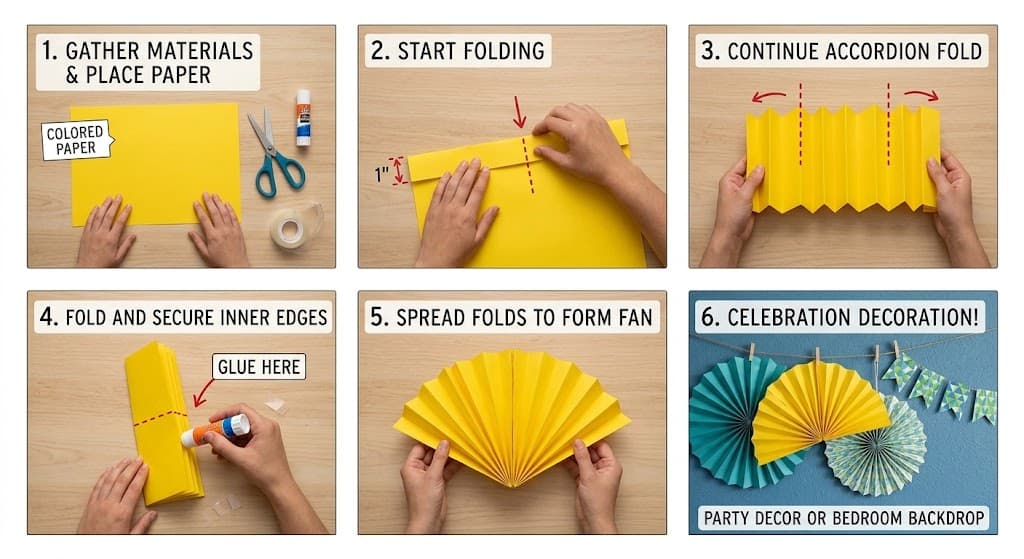
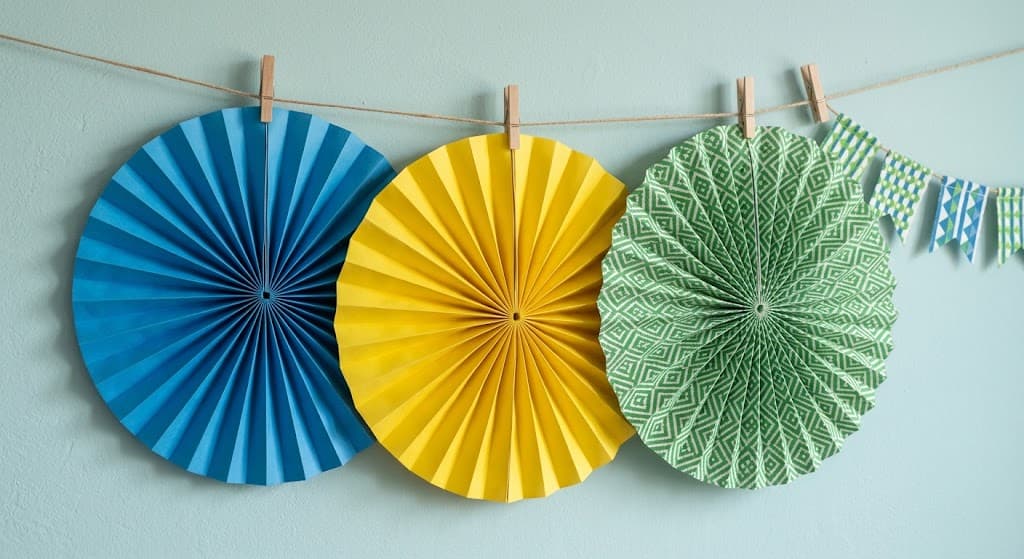
1. Accordion Paper Fans
Paper fans are easy to make and look lovely as party decorations or a colorful backdrop for a bedroom.
What you’ll need: Colored paper, scissors, and glue or tape.
How to make them:
- Place a sheet of paper flat in front of you.
- Fold a narrow strip along one edge, then turn the paper over and fold another strip in the opposite direction.
- Continue folding back and forth until the entire sheet resembles an accordion.
- Fold the strip in half and secure the two inner edges with glue or tape.
- Gently spread the folds to form a fan.
For a fuller, round decoration, make a second fan and attach the two halves together.
Tip: Use coordinating colors or patterned wrapping paper to create a pretty display for birthdays, celebrations, or a bedroom wall. Prefer visual steps? Click here to view the step-by-step photo tutorial.
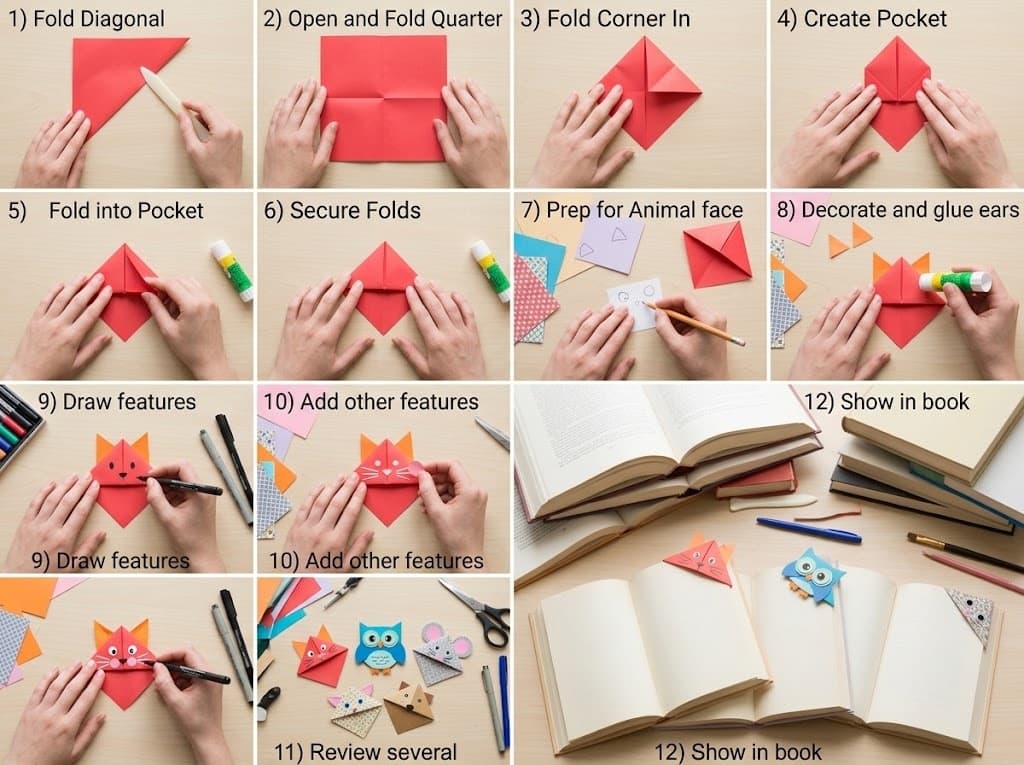
2. Paper Corner Bookmarks
If you enjoy reading, these little bookmarks are a practical way to use up spare paper. They also make sweet handmade gifts.
What you’ll need: Square paper, scissors, glue, and markers.
How to make them:
- Fold a square sheet of paper diagonally to make a triangle.
- With the folded edge at the top, fold the two bottom corners up to meet the top point.
- Unfold the two corners.
- Fold the top layer of the triangle down to create a pocket.
- Fold each bottom corner back up and tuck it into the pocket.
- Decorate your bookmark with a face, flowers, hearts, or any design you like.
Tip: Make a small collection in different colors and designs. You could create animal faces for children (which they will love) or simple floral patterns for friends who love books. Prefer visual steps? Click here to view the step-by-step photo tutorial.

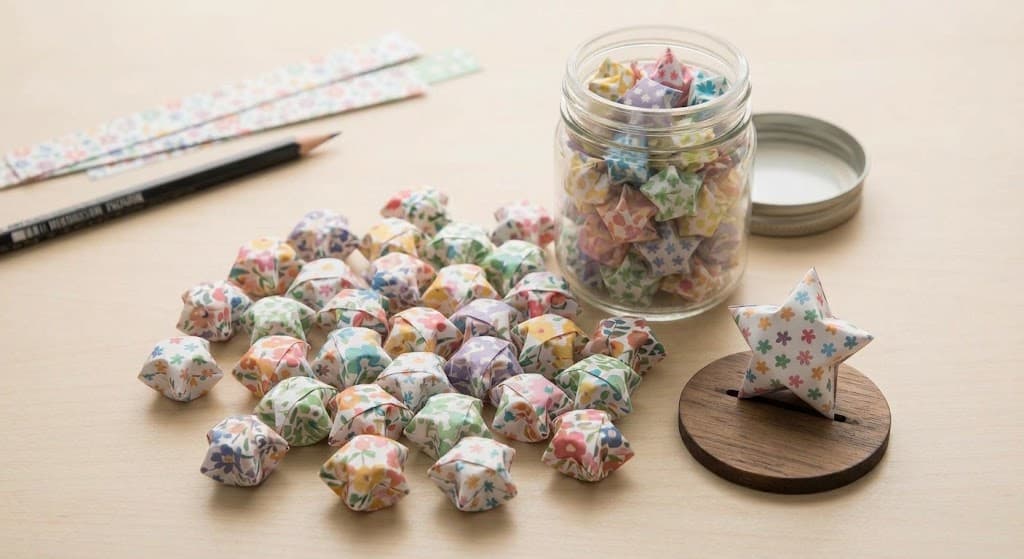
3. Lucky Paper Stars
These tiny stars look lovely in a glass jar, on a desk, or as part of a handmade gift. They take a little practice, but once you get the hang of folding them, they’re quite satisfying to make.
What you’ll need: Narrow paper strips and your fingers.
How to make them:
- Tie a loose knot near one end of the paper strip.
- Flatten the knot gently into a pentagon, keeping the paper from creasing too tightly.
- Wrap the longer end around the pentagon, following its edges.
- Continue wrapping until only a short piece remains.
- Tuck the end into a fold to secure it.
- Gently pinch the sides of the pentagon to puff the star into shape.
Tip: Paper strips about half an inch wide and 10 inches long are a good starting point. Your first star may look a little squashed, but a few attempts will help you get the shape right. Prefer visual steps? Click here to view the step-by-step photo tutorial.
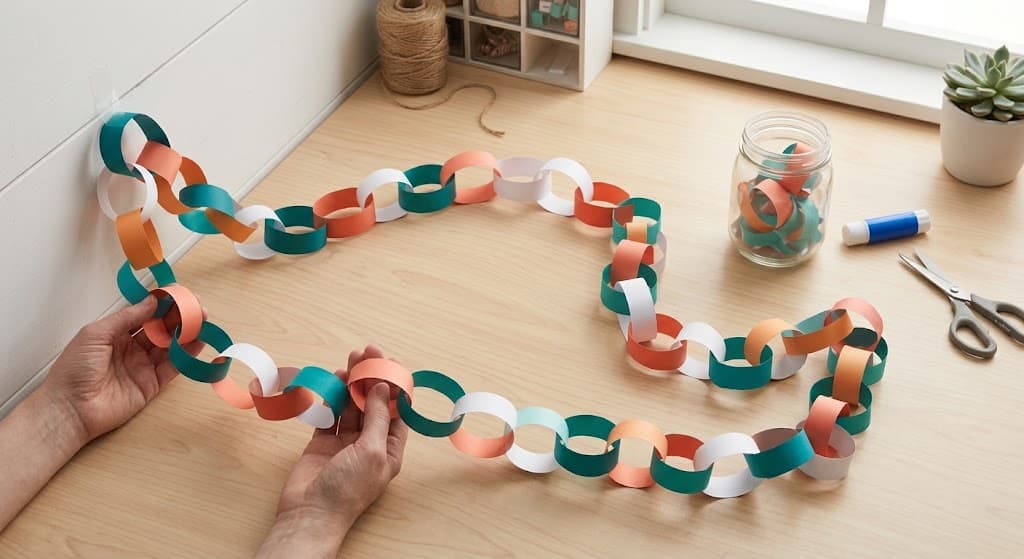
4. Paper Chain Garland
A paper chain is one of the simplest crafts to try, and you can make it as long or colorful as you like. It works for birthdays, holiday decorations, or a little touch of color in a bedroom.
What you’ll need: Colored paper, scissors, and glue or tape.
How to make it:
- Cut paper into strips about 1 inch wide and 8 inches long.
- Bend the first strip into a loop and secure the ends.
- Thread a second strip through the first loop.
- Secure the second strip into a loop.
- Repeat until your chain reaches the length you want.
Tip: Choose two or three colors that work well together instead of using every color at once. You can also match the paper to a party theme or season. Prefer visual steps? Click here to view the step-by-step photo tutorial.
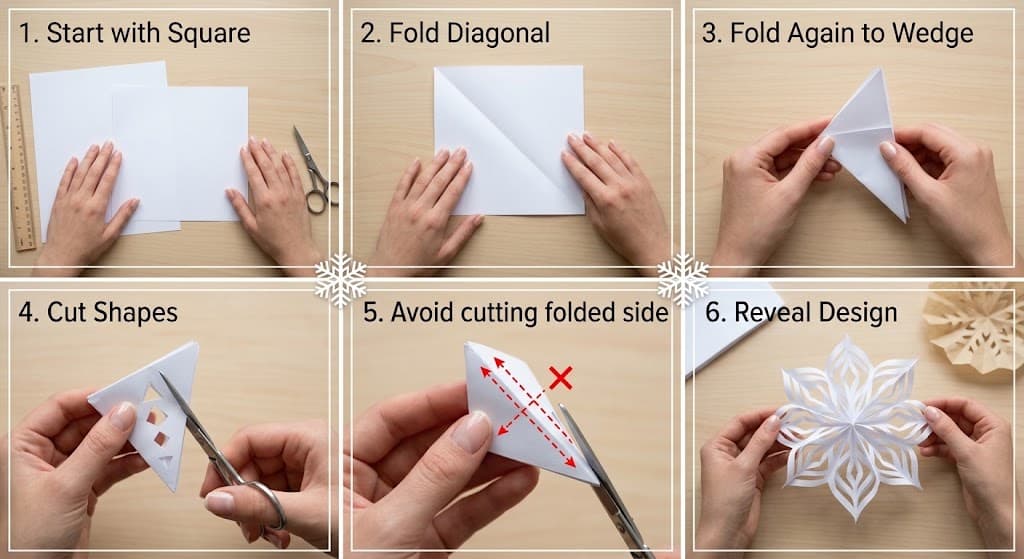
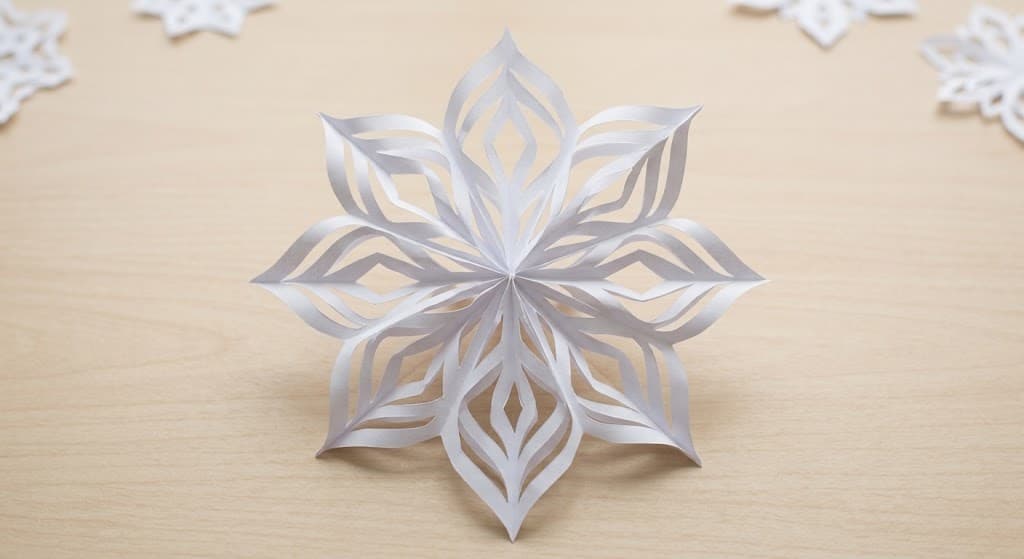
5. Paper Snowflakes
Paper snowflakes are a fun winter craft, even if you live somewhere that never sees snow. Each one turns out a little differently, which is part of the charm.
What you’ll need: White or colored paper and scissors.
How to make them:
- Start with a square sheet of paper.
- Fold it diagonally into a triangle.
- Fold the triangle in half, then fold it again into a smaller wedge.
- Cut small triangles, curves, or other shapes along the edges.
- Be careful not to cut all the way across the folded side, or the snowflake may fall apart.
- Unfold the paper slowly to reveal your design.
Tip: Try coffee filters for delicate, lightweight snowflakes. Tape them to windows or hang them on string for a simple seasonal display. Prefer visual steps? Click here to view the step-by-step photo tutorial.
Paper Crafts That Look Lovely Around the Home
If you want your finished projects to do more than sit in a drawer, these crafts can add color and personality to your space.
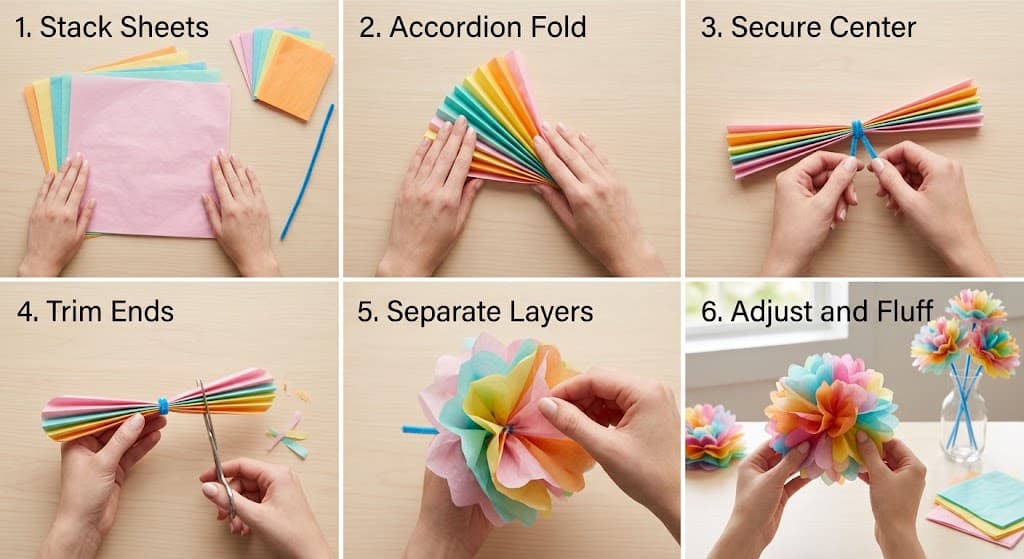
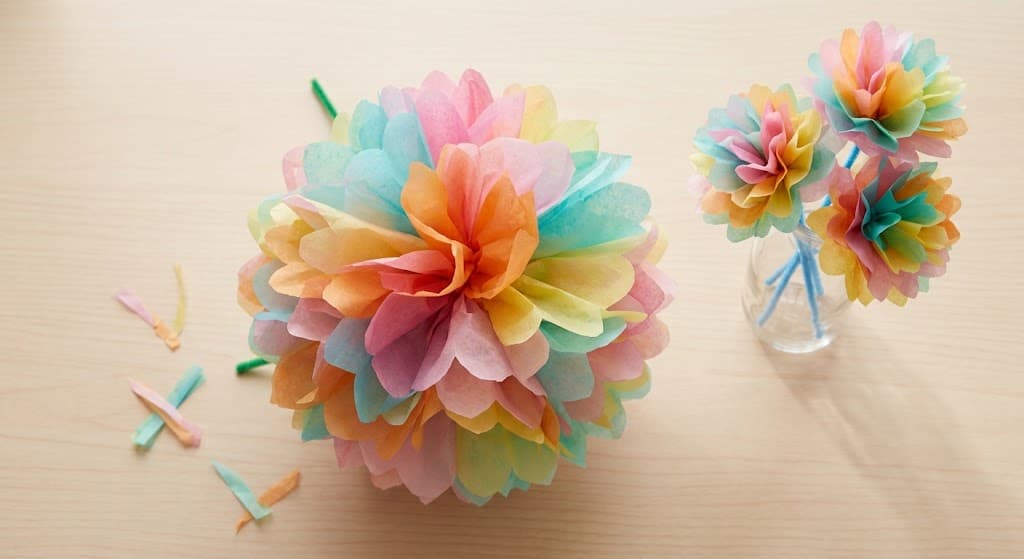
6. Paper Flowers
Paper flowers are a lovely alternative to fresh flowers when you want decorations that last. You can use them in a vase, attach them to a gift, or make a small bouquet for your room.
What you’ll need: Tissue paper, scissors, and a pipe cleaner or floral wire.
How to make them:
- Stack six to eight sheets of tissue paper.
- Fold the stack back and forth in accordion folds.
- Wrap a pipe cleaner or floral wire around the center to hold the layers together.
- Trim both ends into rounded or pointed shapes.
- Carefully separate each tissue-paper layer, pulling it toward the center to create the petals.
- Adjust the layers until the flower looks full.
Tip: Mix two or three colors for a softer, more natural look. Work slowly when separating the layers because tissue paper can tear easily. Prefer visual steps? Click here to view the step-by-step photo tutorial.
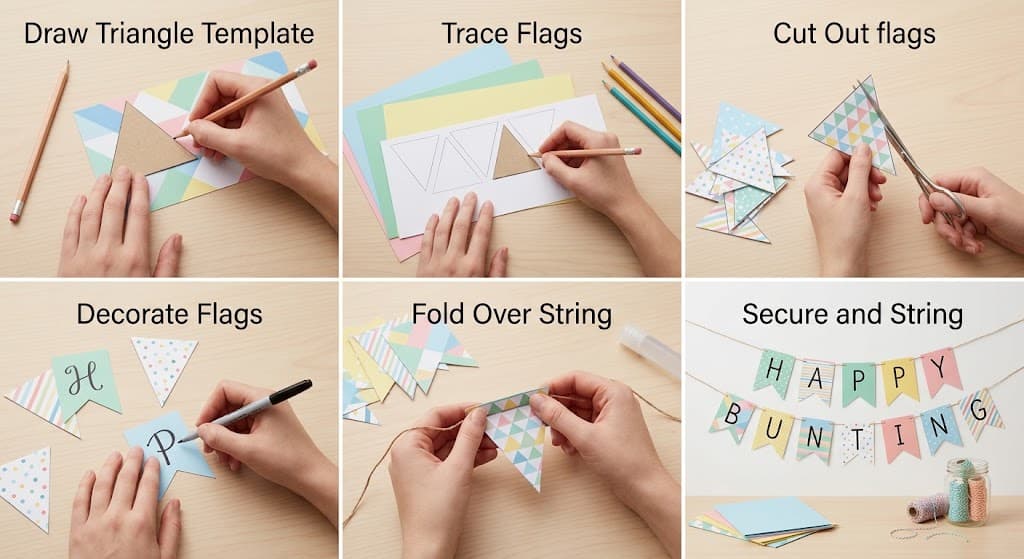
7. Paper Bunting
Paper bunting is an easy way to decorate a wall, shelf, or party table. You can keep it simple with solid colors or make each flag different.
What you’ll need: Cardstock, string, scissors, a pencil, and glue or tape.
How to make it:
- Draw a triangle on a piece of cardboard to use as a template.
- Trace the triangle onto your cardstock and cut out as many flags as you need.
- Decorate the flags with patterns, letters, or small drawings if you like.
- Fold the top edge of each triangle over the string.
- Secure the folded edge with glue or tape, leaving a little space between each flag.
Tip: Try pastel colors for a bedroom, bright shades for a birthday, or seasonal colors for holiday decorations.
Prefer visual steps? Click here to view the step-by-step photo tutorial.

8. Paper Lanterns
Paper lanterns add a cozy touch to a party table or a bedroom shelf. They’re simple to make, and you can use different colors to suit your space.
What you’ll need: Cardstock, scissors, a ruler, a pencil, and glue.
How to make them:
- Place a rectangular sheet of cardstock flat on your work surface.
- Fold it in half lengthwise.
- Starting at the folded edge, cut parallel slits toward the open edge, stopping about an inch before the end. Leave the paper connected along that edge.
- Unfold the sheet and roll it into a tube so the short ends meet.
- Glue the short edges together.
- Cut a narrow strip of paper and attach it to the top to make a handle.
Tip: Use a battery-operated tea light if you want a glowing effect. Never place a real candle inside a paper lantern, as the paper can catch fire. Prefer visual steps? Click here to view the step-by-step photo tutorial.

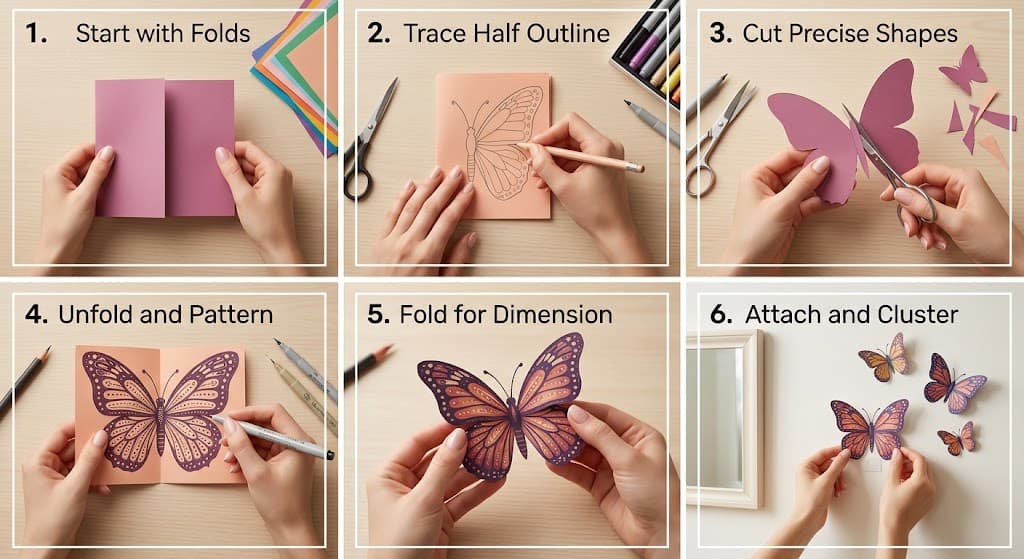
9. Paper Butterfly Wall Art
Paper butterflies can make a plain wall, mirror frame, or craft display feel more playful. You can make a few or create a whole cluster in different sizes.
What you’ll need: Colored paper, scissors, markers, and removable wall putty.
How to make them:
- Fold a sheet of paper in half.
- Draw half a butterfly shape along the folded edge.
- Cut along the outline, then unfold the paper to reveal the butterfly.
- Add dots, lines, or other patterns with markers.
- Fold the wings slightly upward to give the butterfly some dimension.
- Use removable putty to attach it to your chosen surface.
Tip: Cut butterflies in different sizes and arrange them as though they’re flying across the wall. Test your adhesive on an inconspicuous spot first, especially on painted walls. Prefer visual steps? Click here to view the step-by-step photo tutorial.

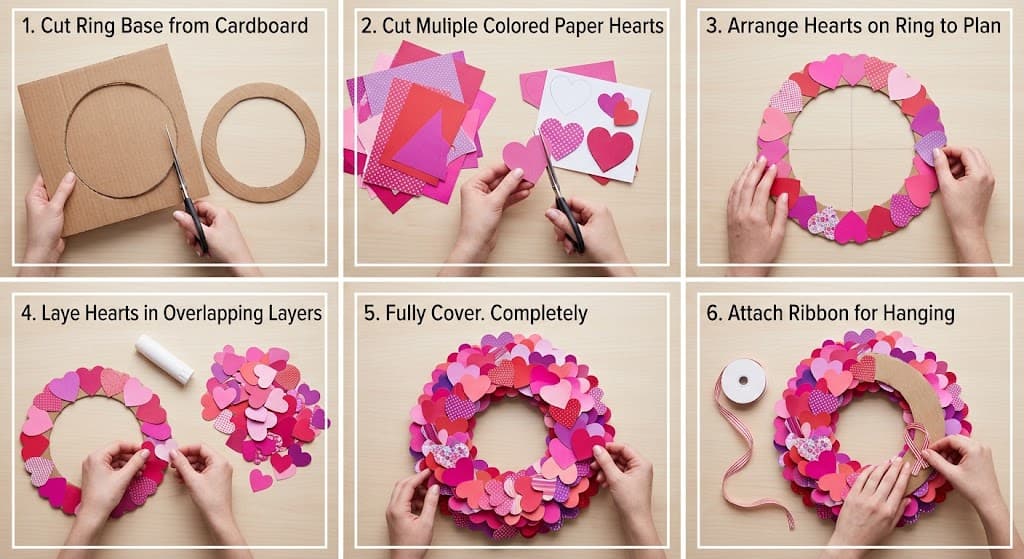
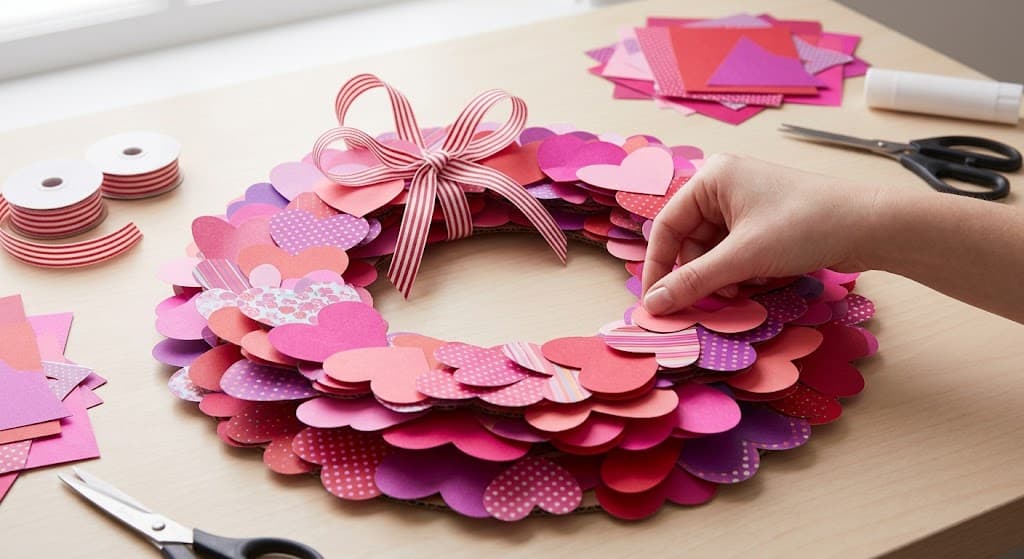
10. Paper Heart Wreath
A paper heart wreath makes a sweet decoration for Valentine’s Day, an anniversary, or any time you want to add a little color to a room.
What you’ll need: Cardboard, colored paper, scissors, glue, and ribbon.
How to make it:
- Cut a ring from cardboard to form the base of your wreath.
- Cut several hearts from colored paper.
- Arrange the hearts around the cardboard ring before gluing them down.
- Glue the hearts in overlapping layers until the cardboard is covered.
- Attach a ribbon loop to the back so you can hang the wreath.
Tip: Try cream, blush, and muted red for a soft look, or choose bright colors for a more playful decoration.
Prefer visual steps? Click here to view the step-by-step photo tutorial.
Easy Paper Crafts to Make as Gifts or Sell
Paper crafts can make thoughtful gifts, and some can become small products to sell. If you plan to sell your work, remember to account for materials, packaging, the time each item takes to make, and any selling fees when setting your prices.
11. Handmade Greeting Cards
A handmade card can feel more personal than a store-bought one, especially when you create it with the recipient in mind. You can make cards for birthdays, thank-you notes, holidays, or everyday encouragement.
What you’ll need: Cardstock, scissors, markers, stickers, glue, and envelopes.
How to make them:
- Fold a sheet of cardstock in half to create your card.
- Decide on a simple design before adding decorations.
- Draw flowers, hearts, or small patterns on the front, or cut shapes from colored paper and glue them on.
- Add a short message inside.
- Let the glue dry before placing the card in an envelope.
Tip: Make several cards using the same color palette but different designs. This gives you a coordinated collection for gifting or selling.

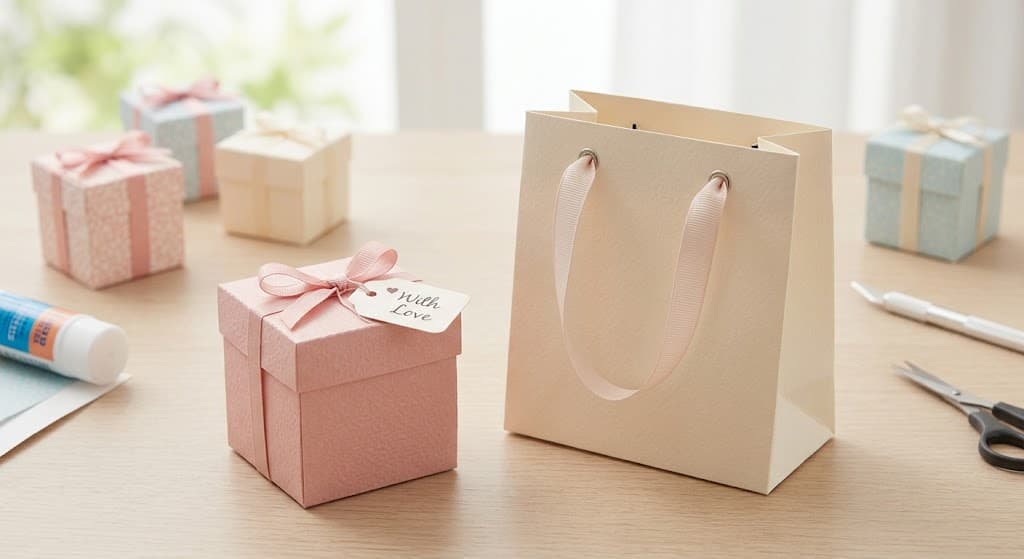
12. Paper Gift Bags and Boxes
Making your own gift packaging is a useful way to turn ordinary paper into something special. Gift bags are convenient for lightweight presents, while small paper boxes work well for items that need a more structured shape.
What you’ll need: Cardstock or sturdy wrapping paper, scissors, glue, a ruler, and ribbon or paper for handles.
To make a simple gift bag:
- Place a small box on your paper and wrap the paper around it, leaving enough extra paper at the top and bottom.
- Remove the box and glue the overlapping long edges together to form a tube.
- Fold the bottom edges inward as you would when wrapping a present, then glue them securely.
- Let the glue dry before opening the bag.
- Fold the top edge inward for a neat finish.
- Attach ribbon or paper handles if desired.
To make a simple gift box:
- Choose a paper box template that matches the size you need.
- Trace the template onto cardstock and cut it out.
- Fold along the marked lines.
- Apply glue to the tabs and secure the sides together.
- Let the box dry before adding your gift.
Tip: Patterned paper looks lovely on the outside, while plain cardstock makes it easier to decorate the inside with a handwritten message.
Prefer visual steps? Jump straight to the paper gift bag photo guide or the mini gift box photo guide.
13. Quilled Cards and Bookmarks
Paper quilling involves rolling thin strips of paper into small shapes and arranging them into designs. It looks detailed, but beginners can start with simple flowers, leaves, and circles.
What you’ll need: Thin paper strips, a toothpick or quilling tool, glue, and cardstock.
How to make them:
- Wrap one end of a paper strip around a toothpick or quilling tool.
- Keep rolling until the strip forms a coil.
- Carefully release the coil and let it loosen slightly.
- Glue the loose end in place.
- Pinch the coil into a teardrop or eye shape if you want petals or leaves.
- Arrange several shapes on a card or bookmark, then glue them down.
Tip: Start with a small flower made from five or six teardrop shapes. Once you’re comfortable with the technique, try more detailed patterns. Prefer visual steps? Click here to view the step-by-step photo tutorial.

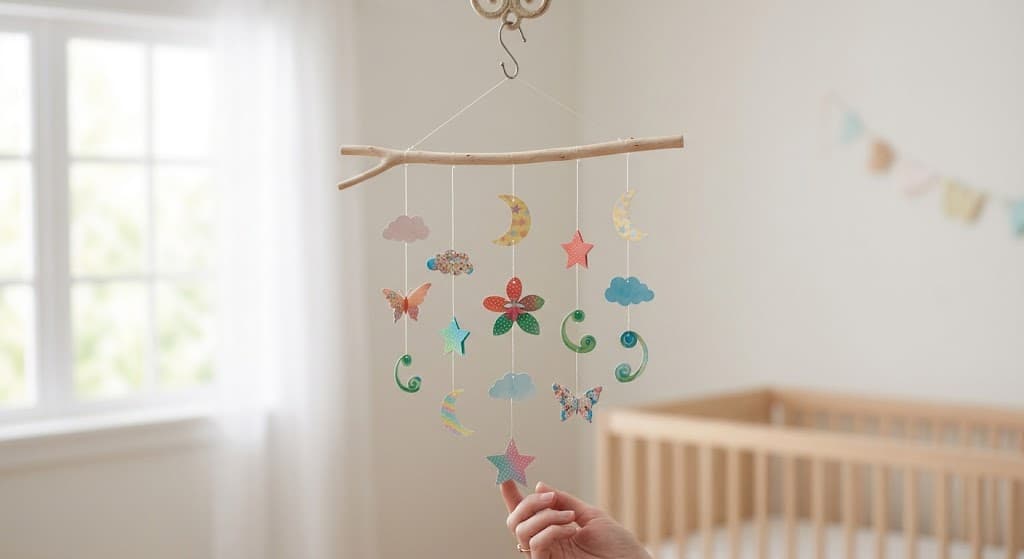
14. Paper Mobile
A paper mobile can add a gentle decorative touch to a bedroom, reading corner, or nursery. You can use simple shapes, stars, butterflies, or origami figures.
What you’ll need: Paper, scissors, string or fishing line, a small branch or embroidery hoop, and tape or glue.
How to make it:
- Cut out several paper shapes in different sizes.
- Make a small hole near the top of each shape, or attach the string with tape.
- Cut strings to different lengths.
- Attach one shape to each string.
- Tie the strings at different points along the branch or hoop.
- Adjust the lengths until the mobile looks balanced.
- Hang it securely from a suitable hook.
Tip: Choose shapes that suit the room. Stars and clouds work well for a dreamy look, while leaves and butterflies can bring a nature-inspired feel. Keep mobiles out of reach of young children.
Prefer visual steps? Click here to view the step-by-step photo tutorial.
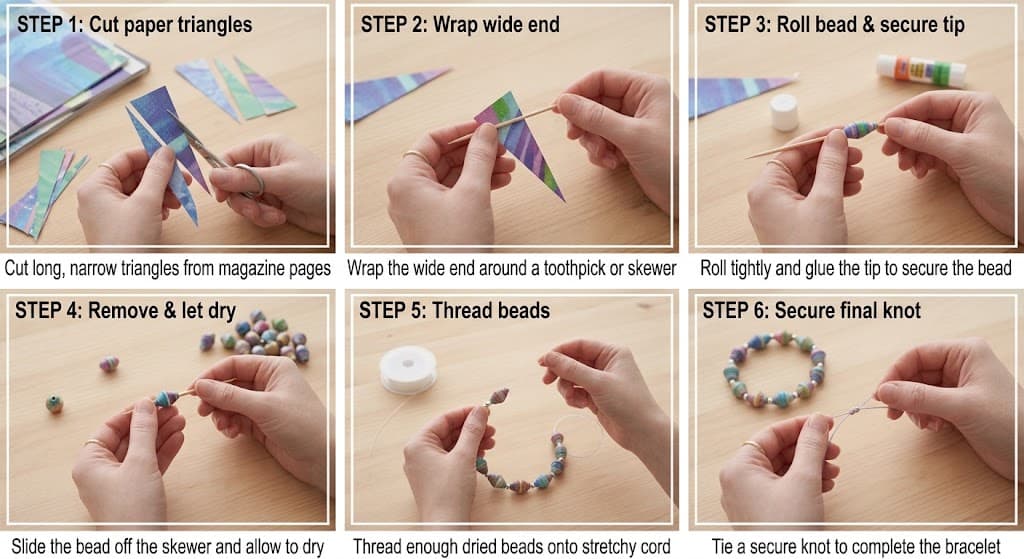
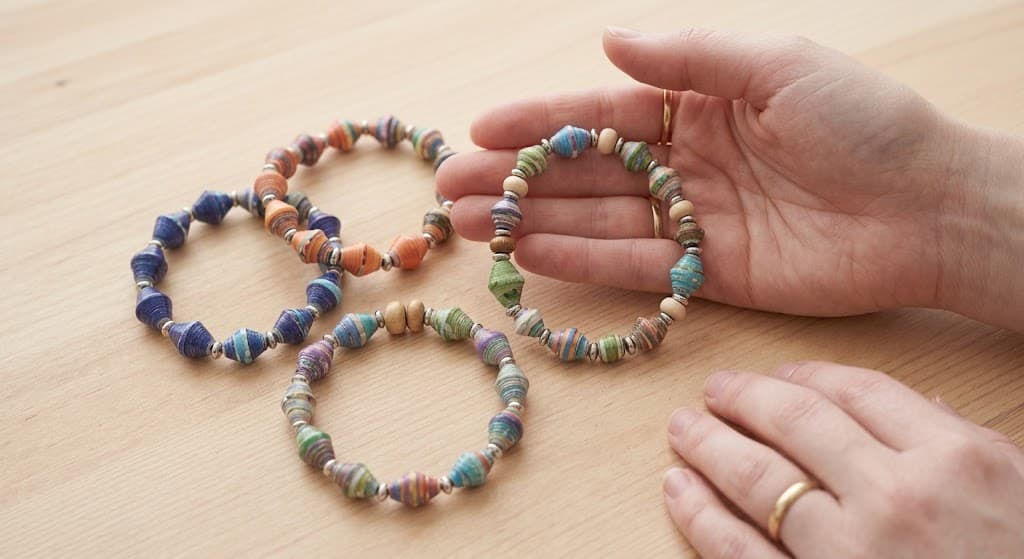
15. Paper Bead Bracelets
Paper beads are a clever way to reuse colorful magazine pages. Once you roll the paper into beads, you can turn them into bracelets, necklaces, or other handmade accessories.
What you’ll need: Old magazines, scissors, a toothpick or thin skewer, glue, and stretchy cord.
How to make them:
- Cut long, narrow triangles from colorful magazine pages.
- Place the wide end of a triangle around the toothpick or skewer.
- Roll the paper tightly toward the pointed end.
- Add a little glue to the tip and press it down to secure the bead.
- Slide the bead off the skewer and let it dry completely.
- Repeat until you have enough beads for your bracelet.
- Thread the beads onto stretchy cord and tie a secure knot.
Tip: Choose pages with colors you like, and roll each bead tightly so it holds its shape. If you want a protective finish, use a craft sealant suitable for paper and follow the product instructions. Let the beads dry fully before stringing them.
Paper bead bracelets can make inexpensive handmade gifts. If you plan to sell them, experiment with different color combinations and make sure each bead is securely finished. Prefer visual steps? Click here to view the step-by-step photo tutorial.
Simple Tips to Make Paper Crafting Easier
A few small habits can make your projects neater and less frustrating:
- Measure before cutting. A ruler helps you make even strips, straight edges, and matching shapes.
- Choose the right glue. Glue sticks work well for lightweight paper, while craft glue may be better for heavier materials. Use only a small amount to avoid wrinkles.
- Practice on scrap paper. Try unfamiliar folds or cuts on spare paper before using the piece you want to keep.
- Keep your work area simple. A clear table gives you room to fold, cut, and arrange your materials.
- Start with one project. Finish a craft before moving on to another so you can see what works and what you might change next time.
- Save your leftovers. Small paper pieces can become decorations, card details, or parts of another project.
Your first attempt doesn’t have to look perfect. Paper is inexpensive, and each project gives you a chance to learn a new fold, cut, or technique.
Done crafting and still looking for ways to fill your free time? Here are more cute things to do when you’re bored at home.
FAQs About Easy Crafts to Do at Home with Paper
1. What are the easiest paper crafts for beginners?
Paper chains, corner bookmarks, accordion fans, and simple paper flowers are good places to start. They require only a few supplies and use basic folding, cutting, or gluing techniques.
2. What paper crafts can I make in five minutes?
A simple paper chain link, a basic corner bookmark, or a small accordion fan can be made in about five minutes once you have your supplies ready. More detailed projects, such as paper stars and flowers, may take longer, especially when you’re learning.
3. What paper crafts can I make to sell?
Handmade greeting cards, paper bead bracelets, quilled bookmarks, paper flowers, and gift bags are possible products to sell. Before setting a price, consider the cost of materials, packaging, your time, and any selling fees.
4. What paper crafts are suitable for kids aged 6–12?
Paper chains, snowflakes, butterfly art, corner bookmarks, and accordion fans are fun options for school-age children. Choose projects that match the child’s skill level, and supervise younger children when they’re using scissors or other tools.
Conclusion
You don’t need expensive supplies or a perfect plan to enjoy paper crafting. A few sheets of paper and a little patience can turn into pretty decorations, thoughtful gifts, or a relaxing afternoon doing something creative.
Start with one project that catches your eye. The more you practice, the faster and better you become, and you may even discover new designs and ideas along the way. So don’t be discouraged if your first attempt comes out a little wonky. Mine certainly did! Keep going, and you’ll be surprised by how much you improve.
Which of these easy crafts to do at home with paper would you like to try first? Leave a comment below, and save this list so you have plenty of ideas to come back to when you feel like making something.